Recreational research into Feudal Japan
Crafts
Resource: the Rijksmuseum
Jun 30th (a Shakkō (赤口))
I recently discovered that the Rijksmuseum, the Dutch national museum, has their collection searchable online with freely-usable images. They’ve got some cool stuff. Here are some highlights, focused on Japanese heraldry.
<img src="http://fireflies.xavid.us/wp-content/uploads/2016/06/Screen-Shot-2016-06-30-at-13.48 traitement viagra naturel.50-300×114.png” alt=”Screen Shot 2016-06-30 at 13.48.50″ width=”300″ height=”114″ class=”alignnone size-medium wp-image-594″ srcset=”http://fireflies.xavid.us/wp-content/uploads/2016/06/Screen-Shot-2016-06-30-at-13.48.50-300×114.png 300w, http://fireflies.xavid.us/wp-content/uploads/2016/06/Screen-Shot-2016-06-30-at-13.48.50-768×293.png 768w, http://fireflies.xavid.us/wp-content/uploads/2016/06/Screen-Shot-2016-06-30-at-13.48.50-1024×390.png 1024w, http://fireflies.xavid.us/wp-content/uploads/2016/06/Screen-Shot-2016-06-30-at-13.48.50.png 1506w” sizes=”(max-width: 300px) 100vw, 300px” /> 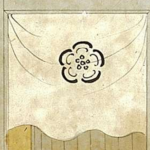
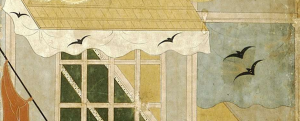
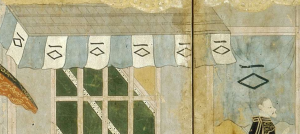
These details from “Arrival of a Portuguese ship”, c. 1600, show mon used on noren (fabric dividers). Of particular interest is the double bird mon that is reduced to a single bird on the smaller noren, showing a notable type of variation, and also the differences of background color between the large and small noren.
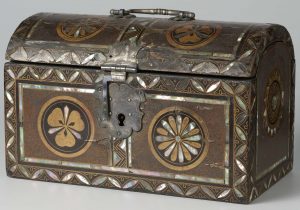
This box, from 1600-1650, shows wood sorrel and chrysanthemum mon with a “seven treasures” background pattern. The use of mother-of-pearl creates an interesting three-color effect, with two colors for the mon and one for the background.
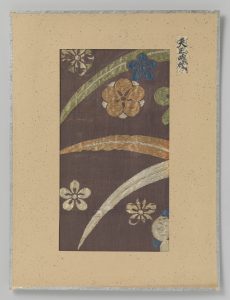
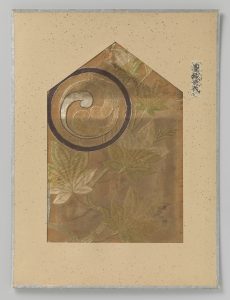
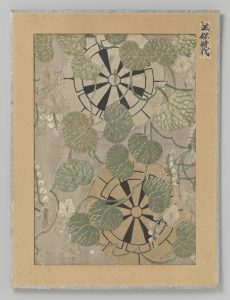
These fabric fragments, from 1573–1591, 1575–1600, and 1644–1648, respectively, show how mon designs could be used in embroidery.
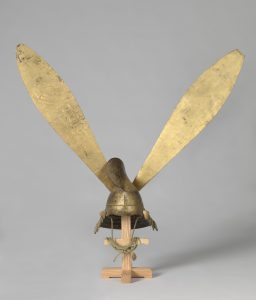
And finally, this heraldic helmet with enormous gold ears is from 1575–1600.
I’m definitely a fan of museums making their collections widely available like this, having used the online collection from the Met extensively for context in my O-umajirushi translation. Enjoy the collection!
Hut in Progress
Jun 5th (a Tomobiki (友引))
I’ve long planned on making a hut based on the one described by Kamo no Chōmei in his An Account of a Ten-Foot-Square Hut, and I’ve finally put some actual time into building it. Chōmei, after a political failure, fled the capital to become a Buddhist hermit, and while doing so wrote an account of his way of life that’s both widely acclaimed in Japan (and often compared to Walden) and handy for anyone trying to recreate such a setup. His hut is actually described as being collapsible, with hinges, for easy transport, and while mine is based more around what I can get for cheap at Home Depot than precise levels of authenticity, that is the right spirit for a SCA structure. I probably won’t have it done for Pennsic this summer, but nothing’s impossible. So far, I’ve got the frame for one wall, and it seems to be working pretty reasonably.


I’ll post some detailed instructions when I’m done, but here are some tidbits so I don’t forget.
- I seem to drill my holes with enough randomness that I can put two screws longer than half the thickness of my wood directly opposite each other without them hitting.
- If at all possible, orient your wood such that you’re not drilling through a knot.
Link: Wax-resist Dyeing
Jun 2nd (a Daian (大安))
I just found a cool description of Japanese wax resist (“batik”) dyeing (rōketsuzome/ろうけつ染め) at Blue Lotus. This way of adding a design to cloth goes back to the Nara period (710–794)(ja.wp:ろうけつ染め) and is one technique that was used to put designs such as mon on kimono. This is something I’ve been wanting to experiment with for a while, and it’s nice to see an easy-to-read description of the modern process in English.Watch movie online Logan (2017)
On Netsuke
Oct 17th (a Shakkō (赤口))
One area of Japanese art popular with collectors are netsuke. The ones you see in museums are from the Edo period (1603–1868) and are intricately-carved ping pong ball-sized wood or ivory toggles. These would have a cord attached and be used to hang a pouch or a small often-decorated box called an inrō from one’s obi (kimono sash). Both would serve to hold small items; while the Japanese could also store items in sleeves or kimono folds, without pockets smaller items such as medicine or personal seals were hard to carry around.(en.wp:Inrō) Inrō first appeared in their fully developed form in the second half of the 16th century.(JN:24)

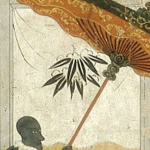
A man using a netsuke to hang an inrō from his obi ties.
While the fancy carved netsuke prized by museums and collectors today didn’t happen until the Edo period, simple practical netsuke were in use earlier. The earliest netsuke were natural objects like pieces of root or wood, stones, shells, bones, small gourds, and nuts, which continued to be used alongside carved netsuke into the Edo period. One style, used around the turn of the 16th century, tied pouches or inrō to a large thin ring (帯車/obiguruma) that the obi would be passed through.(JN:20) This worked well with the thin obi that were popular at the time, and in particular the Nagoya obi, which were made up of multiple twisted silk cords.(<a href="http://fireflies viagra livraison rapide.xavid.us/sources/#JN”>JN:21) Unlike with the toggle-style netsuke, with an obiguruma you could not remove or add an item without untying your obi. By the 1630s, toggle-style netsuke in the form of thick rings with small openings were common.(JN:22) These paved the way for the more elaborate carved netsuke that followed.
Image by Rama; used under CC by-sa 2.0 fr.
On Making Kimono
Aug 15th (a Shakkō (赤口))
One of the classes I enjoyed this week at Pennsic University was Lady Roxanne’s Guide to Sewing Kosode and “Kimono” (handout soon to be available online at Yama Kaminari). I learned how to make kimono many years ago from my friend Chisato, and have made some modifications along the way, so I thought I’d post some responses. I highly recommend the class and handout; her similar class on hakama, which I caught last year, is also very useful.
Comments, in no particular order:
Neck Drop
I tend to do a less deep neck drop for my under layer kosode, to encourage it to be visible under an over layer. I know lots of people skip the under layer or use a fake collar for the effect, but I don’t tend to find two layers too hot. Then again, I often skip the pants, which is more appropriate for a monk than for a samurai.
Backseams
Lady Roxanne’s instructions leave you without a back seam. Back seams would have been necessary in period, due to narrow looms. They are also ‘traditionally’ associated with protection with evil spirits, but it’s unclear whether this is a product of more recent times, when they are no longer demanded by the fabric, or whether this tradition goes back further. The charms used for protection on backseamless kimono (such as those made for children) are cute, but I don’t know of any premodern examples.
Interestingly, Lady Roxanne does stick to traditional fabric widths for her sleeves, making them from a full panel and a half panel instead of a 1.5-panel width piece. I’ve been known to be lazy and skip seams in both places, but as far as I know there’s no mythology in sleeve seams.
Neck Hole
Lady Roxanne has you cut a semiellipse-shaped neck hole. Chisato’s method used a rectangular neck hole that has always made sewing on the collar a pain. I’d started rounding the corners of the neck hole to improve on this, but I bet using the semiellipse would make this work better.
Stitching
As Lady Roxanne mentioned in class, kimono would traditionally be unstitched to wash and the resewn. Kimono also had loose stitching because, if the kimono were to catch on something, it would be better for the stitching to come out (easily repairable) than for the fabric to rip. As someone whose kimonos have ripped many a time, this effect is hard to replicate on a sewing machine, but it’s something to keep in mind, at least when hand-sewing.
Collars
I like Lady Roxanne’s method of hand-sewing-on the collars and sewing them on the very edge of the fabric, to keep the quarter inch or so between a machine-sewed line and the edge from flipping up, like mine tend to do.
I also have the exact problem with short collars that Lady Roxanne mentions, and using long collars that go most of the way to the ground (instead of my current collar-to-the-end-of-the-diagonal) seems likely to fix it well. This is especially a problem when I wear my underkosode without an over layer (with hakama informally, or as part of a LARP costume), because of the reduced neck drop I do with underkosode.
Armpits
Lady Roxanne mentioned that most people seem to prefer closed armpits. I actually really like open armpits hot places (like Pennsic) so I can avoid my armpits getting all hot and sweaty; I was recently annoyed that I didn’t make the armpit holes big enough on my new underkosode. Open armpits also allow more freedom of motion.
Material
I recommend linen as being an easier-to-obtain fabric that is similar to the authentic hemp. Cotton is both rare in period and breathes less well. Of course, silk is also great and authentic.
Quilting
Lady Roxanne mentioned that the quilted kimono she has seen have quilting visible from the inside only. That’s good to know, since I’ve been thinking of making an actual Japanese warmth layer one of these days instead of just borrowing cloaks from people all over the place.
Overlap Pieces
I have a way of doing the front overlap pieces that saves fabric, if you know the angle you want to cut the front ahead of time, but is more complicated to explain. Instead of doing two full-height half-panel overlap pieces, leave yourself a single half-panel length. (Twice the kimono height minus neck drop is more than enough, but if you’re like me and want to use every part of the buffalo you can do this without cutting this piece to length.) Pin this piece to one side of the front, even at the bottom, and then draw and cut the angle for that half. Flip the remainder and it’ll be the right angle to attach on the other side. Note that this will do the wrong thing if your fabric has a vertically directional pattern, because one side’s overlap piece will be upside down relative to the other.
Sleeves
If you’re using pocket sleeves, be aware that things can fall out the back of the sleeves. With open armpits, sew up the back of the sleeve like you do on the front to make the pocket. I’m not sure how best to do this with closed armpits; you could sew a short seam between the sleeve and the body, but I’d worry that this would restrict arm motion.
I believe monkish overkimono would often have two-full-panel-width sleeves, so you could put your hands together completely covered by sleeve when praying in the cold. I think they also stayed larger-diameter as samurai sleeves became smaller and more practical.
I’d highly Lady Roxanne’s classes to anyone interested in making their own Japanese garb. She’s a great teacher and has ample experience. The handout’s great, but it doesn’t do her justice.
If you’re interested in more kimono references, you may wish to check out my Japanese garb page at The Academy of Seven Monkey, updated to include some links Lady Roxanne mentioned in class.
